In this post I will be discussing a guide to my view of the ultimate media center computer as of 2025. Many of these choices are personal and opinionated, but I will explain each choice further down. The PC will be equipped for the following:
- Coding: BASH, CSS, GDScript, HTML, Javascript, Python 3
- Emulation: DOS and others
- Gaming: Linux, Windows, Android, and emulated games
- Multimedia Production: image, video, audio, and 3d modeling
- Music Consumption: mp3, m4a, wav, opus, and online discovery of music
- Music Production: live, recorded, and produced
- Physical Media Compatibility: 8track, AM/FM radio, cassette, CD, DVD, VHS, vinyl record
- Privacy: with a mild threat model to protect modesty against corporate data harvesting
- Reading: for reading epub, mobi, and cbr files
- Security: to harden against malware, threat actors, data loss, identity fraud, and corporate spyware
- Video: streaming, local files, and youtube content
- Virtualization: Windows and Android for gaming and comparability
I will be building this computer from scratch and installing all necessary software. As an overview, I will first discuss the hardware, OS, then software in the above categories as well as an overview of their setup. I will be using Fedora Linux as an OS; although I prefer LMDE, Fedora has solid Wayland, HDR, and AMD Freesync support with KDE. Wayland support in Cinnamon is experimental at the moment.
Hardware
The main hardware requirement will be Linux compatibility, as I will be using Fedora Linux . Most hardware works well with Linux if it is not too new; I will also be building an all AMD system as NVidia drivers are a nightmare to deal with on Linux. I’m also not a big fan of RGB, which might be a deal breaker for some. I want my PC to be eihter Yellow, Wood, Retro, Matte, or Vaporwave themed; but you can get a different case and peripherals to fit your own style. Also see the same build on PCPartPicker. The cost of the PC itself as of 2025 is about $3.6K and the cost of all the peripherals is about $5K, totaling $8.6K.
Computer Specs
CPU: 4.2 GHz, 16 cores, 32 threads
GPUs: (each) 16GB VRAM, 1.83 GHz, 72 raytracing cores
RAM: 64GB dual channel DDR5
SSD Storage: 3TB
HDD Storage: 16TB RAID5 (12TB functional, 4TB backup)
External Storage: 4TB HDD backup
Average Power Draw: 300W-600W
Max Power Draw: 1200W
OS: Fedora Linux
DE: KDE Plasma
WM: Wayland
Media: 8track, AM/FM radio, cassette, CD, DVD, floppy disk, VHS, vinyl record
| Part | Name / Link | Stats | Cost |
|---|---|---|---|
| CPU | AMD Ryzen 9 7950X3D | 4.2 GHz 32 Threads | $740 |
| CPU Cooler | Custom Copper Tube Liquid Cooling | 40dB | ? |
| Motherboard | ASRock X670E Taichi | EATX AM5 x4 DDR5 RAM x8 SATA x2 PCIe x16 x3 M2 USB 2, 3, and C 2.5mm audio Ethernet LAN 802.11 Wifi Etc. | $450 |
| RAM | x2 G.Skill Trident Z5 Neo | 32GB each DDR5-6000 | $200 |
| SSD Storage | x3 Toshiba XG6 | 1TB each M2 | $225 ($75 each) |
| HDD Storage | x4 Toshiba X300 | 4TB each SATA | $500 |
| Backup Storage | Toshiba X300 | x1 4TB USB-C | $125 |
| GPUs | x2 AMD Radeon RX 6800 XT | 16GB VRAM each 1.83 GHz 72 Raytracing Cores | $1000 ($500 each) |
| Case | Geometric Future Mode 6 or custom steampunk/wood case | Mid Tower ATX | $150 |
| PSU | ASRock PG-1300G | 1300W ~$80/Mo at 0.17¢ | $190 |
| Extra Cooling | Apevia AF512L-SYL | 25dB | $25 |
Peripherals
| Part | Name | Stats | Cost |
|---|---|---|---|
| Modem/Router | Netgear Nighthawk CAX30 | 2.7Gbps Docsis 3.1 | $300 |
| Monitors | x2 MSI 274QPF-QD | 27″ QHD 170Hz FreeSync | $440 ($220 each) |
| TV | Any “dumb” TV | 1440p LCD At least 60Hz | $200-$500 |
| VR | Valve Index | Full VR set | $1000 |
| Keyboard | Yellow: Yellow Retro: 8bitdo Retro Wood: Bamboo Steampunk: Typewriter Vaporwave: Purple Matte: DAREU EK98pro | Compact with Numpad | $20-$150 |
| Mouse | Yellow: Yellow Retro: Lofree Touch Wood: Mahogany Steampunk: Steampunk Vaporwave: Logi M325 Matte: Logi M550 | Office mouse, USB-A | $20-$60 |
| Mouse Pad | Yellow: Golden Waves Retro: Lemmings Wood: Grain Steampunk: Clockwork Vaporwave: Synth City Matte: Blackwave | Any size, felt | $5-$30 |
| Speakers | Edifer R1280Ts | Bookshelf 4″ bass drivers 52Hz – 20KHz | $170 |
| Headphones | Beyerdynamic DT 990 Pro | Open, Over-ear 5-35000Hz 250Ω | $180 |
| Audio Mixer | Mackie 802VLZ4 | 8 Channels 2ch EQ Phantom Power XLR and Tape inputs Onyx Preamp | $200 |
| Microphone | Shure MV7X XLR | Dynamic 50 Hz – 16 kHz | $200 |
| Instruments | Epiphone G-400 Casio CT-S400 Novation Launchpad | Electric Guitar MIDI Keyboard Ableton Launchpad | $200 $270 $80 |
| Amp | Orange Crush Mini | Mini Amp | $75 |
| Pedals | Behringer VD400 Boss RV-6 Boss SD-1 Boss BF-3 Sonicake Noise Wiper | Delay Reverb Overdrive Flanger Gate | $40 $150 $60 $150 $35 |
| Controllers | XBox Series WiiMotes Mayflash Dolphinbar N64 Controller | Bluetooth, USB-C, or USB-A | $80 $30 $30 |
| Stickers | Manufacturer Stickers Style Stickers | Fedora, Linux, AMD, Toshiba, ASRock, GSkill, XBox Yellow, Retro, Steampunk, Vaporwave | Varies |
| LEDs | Yellow: Yellow Retro: Beige Wood: Orange Steampunk: Orange Vaprwave: Purple/Cyan Matte: White | USB-A Dimmable | $20 |
| External Media | Floppy Reader Record Player Cassette Player AM/FM Radio 8Track Player VCR CD/DVD ROM | USB-A RCA 2.5mm 2.5mm RCA RCAV USB-A | Varies |
| Misc | SATA to USB-C HDD Case USB Pen Drives Headphone Stand Phone Clamp Mic Snake Arm HDMI to USB-A video capture card DisplayPort hub Thermal Paste | Various | Varies |
| Cables | x3 DisplayPort m2m x2 HDMI m2m x1 MIDI interface m2m x4 1/4″ m2m x1 dual RCA m2m x2 RCA to 1/4″ m2m x2 2.5mm to 1/4″ m2m x1 XLR m2f x1 RCAV m2m x1 RCAV to HDMI converter f2f 2.5mm to USB-C f2m N64 to USB-A adapter cat5e rj45 m2m coaxial cable m2m Power cables and power strips | Make sure video cables are rated for at least 1440p. Also make sure not to exceed 1200W per outlet. Your PC should get its own outlet with nothing else plugged in. | Varies |
| Friend | Mr Tux | Linux Mascot | $35 |
Why I chose certain hardware
AMD Ryzen 9 7950X3D
On top of needing a decent CPU for gaming, having multiple cores helps a lot with virtualization, especially if utilizing the host and guest at the same time. Also supports AMD-V and AMD-Vi (IOMMU) for virtualization.
AMD Radeon RX 6800 XT #1
AMD offers superior drivers when it comes to Linux. FreeSync is also much better than GSync when it comes to Wayland as well. This will act as the main gaming GPU.
AMD Radeon RX 6800 XT #2
The second GPU will be used for virtualization and passed through to VMs. This GPU has been confirmed to work in KVM/QEMU and supports the needed tech for VM gaming.
ASRock X870E Taichi
Has all the IO features I’m looking for. Supports IOMMU for virtualization as well as Raid 5 for SATA storage. Has 2 PCIe x16 slots for my dual GPU setup and supports dual channel ram.
Toshiba X300
Currently Toshiba has the best track record for long lasting and dependable HDDs. I’ve had mine for almost 15 years with no problems.
Office Mouse
I personally prefer the ergonomics of common office mice like the Logi M250. I’ve tried out various gaming mice and do not like how they feel.
Compact Keyboard
While I think mechanical keyboards are cool, the clacking kinda annoys me during daily use. I prefer something more compact and with a slimmer profile. As long as the buttons have decent tactile feedback I only really care about the form factor.
Beyerdynamic DT 990 Pro
At 250 Ohms the DT 990s make excellent studio quality headphones. They also double for great audio during gaming. Their high resistance (ohms) allows them to have a more dynamic range and higher volume when dealing with mic-level and pre-amped audio.
XBox Series Controller
Despite being made by Microsoft, the XBox series is very easy to interface with Linux. Growing up on XBox I am also used to and prefer the Xbox controller’s layout and ergonomics.
External Media
I enjoy vintage tech and old media formats, specifically VHS, Casette, Records, and 8-Tracks, which is why I incorporated them into my build.
PC Assembly
First step is to assemble the PC. There are plenty of guides online, but here are the steps in general:
- Make sure your workplace is static free. Wear shoes and touch a metal object that is grounded to discharge any built up static. Make sure your workspace has plenty of room and lay down a towel or mat to discourage static discharge. Even the smallest shock could damage PC components.
- Unbox and inspect PC parts for damage. Many a time have I heard of friends receiving PC parts that were broken.
- Start assembly by inserting the CPU into its socket.
- Insert RAM into the DDR5 slots, using dual channel configuration (e.g. if there are slots 1 2 3 4, put the RAM sticks in slot 2 and 4).
- Install the motherboard into the case. Remember to fit any fittings or gaskets to the motherboard depending on your chosen cooling solution.
- Install CPU cooling solution. I will be making a custom copper tube liquid cooler (which I will make a separate guide for in the future), but any fan with the right size will do. Make sure to apply thermal paste before attaching the CPU fan. Also install any other extra fans.
- Install the SATA HDDs, connecting SATA cables as necessary.
- Install the PSU or power supply unit, attaching cables to necessary components including LEDs if any. Generally you will have to connect the ATX/EPS connectors to the PSU, as well as PCIe power connectors and SATA power connectors.
- Install PCIe devices including 2x SSDs, sound card, and GPU.
- Make sure everything is securely attached including RAM sticks, fans, and any screwed components.
- Seal up the PC and celebrate: the first part is done!
Operating System
I will be installing Fedora Linux for its respect of privacy, better security, faster speed, and freedom to tinker. I will not be using Windows due to its bounty of privacy invasions, driver issues, anti-consumer practices, and proprietary structure. I will also not be using LMDE my favorite distro, because Fedora has much better support for Wayland, which offers access to HDR, Android Apps, and AMD FreeSync technology which are game-changers for gaming.
As of 2025, the Fedora installation process is fairly straight-forward.
- On a separate computer you will need 3 things, the Fedora KDE ISO file, a pen drive with at least 3GB, and either Rufus, Fedora Writer, or Balena Etcher. Make sure to grab the KDE version of Fedora, as it supports Wayland, HDR, and AMD FreeSync.
- Plug your pen drive in and open up one of the above programs.
- Make the pen drive bootable via one of the programs; make sure to pick the USB drive, as you will overwrite all the contents on it. You don’t want to erase everything on the wrong drive.
- Plug the drive into your new PC once finished. Power it on while pressing F2 (sometimes delete key) repeatedly to bring up the BIOS.
- Go to the boot menu and select your pen drive. You should now boot into a live instance of Fedora where we can install the OS.
- A popup should appear prompting us to install Fedora. Click install.
- Choose your language.
- For installation method, choose “whole disk”. Be aware this will overwrite all data on your system, if you have any.
- Select encrypt disk; this will provide extra security for the files on your drives. Make sure to remember your encryption password!
- Proceed and check the box confirming that you are sure everything will be erased and click install.
- Do not power off or interrupt the install process, as doing so can lead to bricking in certain scenarios.
- Once finished, restart the system and remove the pen drive.
- Once booted in, select your language, configure your keyboard, and disable location services & problem reporting.
- Configure your time-zone. Doing so accurately is important for other internet services.
- Enable 3rd party repositories to get updates faster.
- Create your user and password. Check “make this user administrator” to give yourself sudo privileges. Password should be at least 8 characters and contain numbers, letters, capitals, and symbols for best security.
- Enjoy your new Linux install!
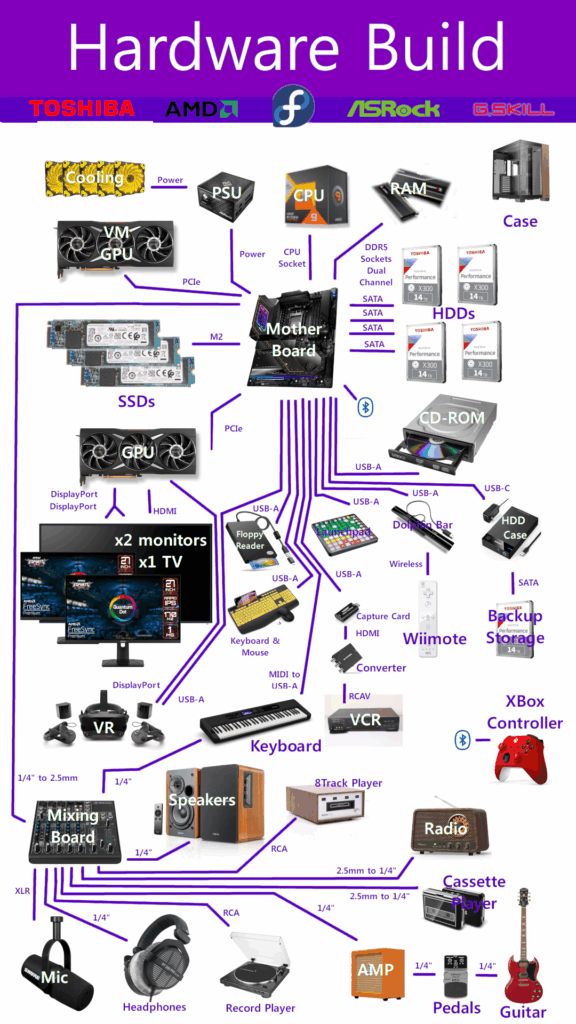
Hardware Connectivity
Now its time to set up all of the peripherals. The audio will be the most complex. See the chart above for connectivity.
Video
Connect the two monitors to the DisplayPort splitter. Plug the splitter into a DisplayPort port on the back of the PC. Plug the TV in to the PC via HDMI. Plug the Valve Index base station into the other DisplayPort port, and the headset into a free USB 3.0 port.
VCR
You will need various adapters to set up a VCR for use with a PC. Plug an RCA cable into the VCR and into an RCA to HDMI adapter. Plug the HDMI cable into a USB-A video capture card, and plug the USB-A into your PC. Chain will look like VCR – RCA Cable – HDMI Adapter – HDMI Cable – Capture Card – PC. Use the program OBS Studio to set up a live feed from your VCR. Pop in a tape and watch.
Audio Out
Start with the mixing board. Using a dual 1/4″ to RCA cable, connect the Audio Out L to the white port and the Audio Out R to the red port on your speakers. Connect headphones to the headphones port with a 1/4″ cable.
Audio In
Connect the following to the AUX IN ports for each channel. Reserve channel 1 for the XLR microphone.
Channel 1: XLR mic (XLR m2f)
Channel 2: PC Audio (1/4″ to 2.5mm m2m) connect to 2.5mm line out port on back of PC.
Channel 3: Phone Audio (1/4″ to 2.5mm m2m with USB-C dongle f2m)
Channel 4: Guitar Amp (1/4″ m2m)
Channel 5: Piano Keyboard (1/4″ m2m
Channel 6: AM/FM Radio (1/4″ to 2.5mm m2m)
Channel 7: Cassette Player (1/4″ to 2.5mm m2m)
Tape In: Record Player or 8-Track Player (RCA m2m)
Tape Out: (RCA to 2.5mm Y cable m2m) connect to 2.5mm line in port on back of PC. Note a con to this setup is you will only get mono audio to your computer for recording.
Guitar
Connect the guitar to your first pedal. Chain pedals with short 1/4″ cables as desired, and end with a connection to the amp. Connect the amp to channel 4 on the soundboard via 1/4″ cable.
USB
Connect the following devices to the USB ports on the back of the computer.
Valve Index: USB-A 3.0
Piano Keyboard MIDI: USB-A 3.0
CD/DVD ROM: USB-A 3.0
Floppy Reader: USB-A
Launchpad: USB-A
Keyboard dongle: USB-A
Mouse Dongle: USB-A
VCR Capture Card: USB-A
Mayflash Dolphin Bar: USB-A
Backup HDD: USB-C 4.0
Bluetooth
Xbox Series Controller
Configuration
Raid 5 Storage
Now we will configure our SATA drives for a Raid 5 setup via the terminal. We will do so using the mdam utility. First install mdam:
sudo dnf install mdamNext we will partition and format all of our drives with parted. First use fdisk to list all of your drives.:
fdisk -lUse the parted command on each of your 4 sata drives to format:
parted /dev/sde mklabel msdos
Next, use the fdisk utility to create a disk partition on each drive; do the following for all 4 drives:
fdisk /dev/sde
This will give you a few options. Select the following
- press n (create new partition)
- press p (select a primary partition)
- press Enter (default is partition number 1)
- press Enter (default is First Sector)
- press Enter (default is Last Sector)
- press t (change partition type)
- type fd (selects Linux autoraid)
- type w (write all changes to disk and exit)
Finally we will use mdam to create the Raid array; make sure to replace the drives with your drives that you got from the fdisk -l command:
mdadm --create /dev/md1 --level=raid5 --raid-devices=4 /dev/sde1 /dev/sdf1 /dev/sdg1 /dev/sdh1
In pseudo code what this command does is:
mdam, “create a mountable drive” “with a raid5 configuration” “with 4 devices” “with these four SATA drives”
Your drives are now being configured for raid. This process will take a while, but you can use the following command to check progress:
mdadm --detail /dev/md1
Once you see
State: clean
your drives are fully initialized. At this point we can format the ext4 file system of our new raid drive with the mkfs command:
mkfs.ext4 /dev/md1
This will also take a bit of time. Once it is done, we can create and mount the Raid array. Replace “storage” with whatever you wish to name the drive.
mkdir /storage
mount /dev/md1 /storage
Settings & Customization
Colors & Themes: Make your new install your cyber home. Head over to System Settings>Colors and Themes and choose your favorite themes. Play around with the settings and customize what you are comfortable with.
Display & Monitor: Under Display&Monitor, make sure your resolution is 2560×1440 and refresh rate is 170Hz matching your monitors. You may have to unplug the HDMI cable to your TV if you don’t see the relevant resolutions and refresh rates. Also switch color accuracy to “prefer color accuracy”.
Program Icons: You can also change the icons for all of your programs to match your color profile. Download new .png icons from the web or make your own. Furthermore, you can also download applets and different taskbars and start menus by right clicking on them. KDE has many powerful ways to customize your desktop to how you like it.
Software
Next up is installing and configuring the new system for gaming, productivity, optimal security, and privacy. On Linux there are different types of programs. System packages are installed via the terminal or package manager, while programs called flatpaks are installed via the discover store. Flatpaks are sandboxed and restricted programs, while system packages are obtained through repositories, which are usually vetted and confirmed to work on your system. Each distro has their own repository, where you can download from via the terminal using the <dnf> command. There are also 3rd party repositories, where the same software is mirrored. We enabled these during installation.
Essential Programs
You can install programs via the KDE discover store on the toolbar and the <dnf> command in the terminal. Here are some essentials and what they do. See my Linux Programs page for the best software; I will only be going over essentials and programs that need explaining below.
Mullvad VPN
It is a good idea to install this first to encrypt your internet traffic right off the bat. Install by entering the following code, obtained from Mullvad’s Website. Anything after a # is a comment and does not need to be typed:
# Fedora 41 and newer
# Add the Mullvad repository server to dnf
sudo dnf config-manager addrepo --from-repofile=https://repository.mullvad.net/rpm/stable/mullvad.repo

# Install the package
sudo dnf install mullvad-vpn
Librewolf
Librewolf has significant privacy advantages over stock Firefox. See Librewolf. Also install Ublock Origin, NoScript, and Privacy Badger as addons. Switch the default search engine to DuckDuckGo. Type about:config into the librewolf searchbar and change enable.letterboxing = true to combat fingerprinting.
Timeshift
Take snapshots of your OS’es state. If something goes wrong, simply revert to an older snapshot. I usually keep 2x monthly, 1x weekly, and custom snapshots before tinkering.
Steam & Proton
The well-known and well-loved games storefront. Steam personally forwards the development of Proton, which allows Windows games to run on Linux. Installing a game via proton with Steam is very easy. I prefer installing the Steam system package over the Flatpak.
Pegasus
A frontend for any emulated games and your steam games as well. Pegasus is very intricate and has a ton of customization options so I will only go over the basics here. You can read the Pegasus Getting Started Guide as well.
- Install the Pegasus Flatpak.
- Install a custom theme by downloading one from pegasus.org and placing in the
/home/.config/pegasus-frontend/themes/folder. I enjoy the Retro Mega Next theme. - Use Skyscraper via the terminal to add metadata and images to your collection. Read how to use here or via the –help command.
- Edit each system’s media.txt file to configure launch commands for emulators like Dosbox X.
Flatseal
A program that allows you to modify permissions of all installed Flatpaks. Essential for fine-tuning and sandboxing applications.
Lutris & Bottles
For running Windows programs via a compatibility layer in Linux. Steam handles its own games well with Proton, but if you have any non-steam games, like through GOG or on disc, Lutris and Bottles both make running them easier.
Media Center Programs
Below are programs that fulfill the abilities I outlined in the beginning of the post.
Coding
Emacs: for BASH
Kate: for CSS, GDScript, HTML, and Javascript
Idle: for Python3
Emulation
Dosbox X: for MS-DOS emulation
misc.
Gaming
Godot: for game development
GOG: for buying DRM-free games
Lutris: for Linux and Windows compatibility
Pegasus: for organizing games in a pretty frontend
Steam:for buying games and Linux-Windows compatibility
Waydroid: for Linux-Android compatibility
Multimedia Production
Blender: for 3D modeling
GIMP: for raster image editing
Godot: for game development
Inkscape: for vector image editing
Libre Office: for word, powerpoint, and spreadsheet editing
OBS Studio: for streaming, and recording audio/video
Scribus: for publication and document editing
Shotcut: for video editing
Music Consumption
Celluloid: for playing local audio files, supports wav, mp3, m4v, opus, and others
Nuclear: for discovering new music
Shortwave: for listening to internet radio
Music Production
Audacity for recording and waveform editing
LMMS: for music production, VST plugins, and MIDI instruments
Privacy
DuckDuckGo: for making private searches
Flatseal: for finetuning flatpak permissions
Librewolf: for blocking fingerprinting
Privacy Badger: for blocking trackers
Ublock Origin: for blocking malware
Reading
Calibre: for reading books and comics and editing metadata
Koodo Reader: for reading books and comics with a minimalistic interface
Security
Clam AV: for an antivirus with file and systemwide scanning
Flatseal: for editing flatpak permissions
KeePass XC: for storing and encrypting passwords
Mullvad VPN: for encrypting and securing internet traffic
NoScript: for blocking cross-site scripting malware and cross-domain tracking
Video
Celluloid: for playing local video files
Freetube: for accessing YouTube content in a privacy respecting way
Kodi: for organizing local video files
Librewolf: for accessing streaming sites more securely
VLC: for playing and streaming lesser known video codecs
Virtualization
KVM/QEMU: for emulating Windows and other OSes
Virt Manager: for making an easy GUI interface f or KVM/QEMU
Waydroid: for providing a compatibility layer to run Android apps
Media
Best ways to craft a media library on your PC:
Books/Comics/Manga: Calibre and/or Koodo Reader.
Calibre is a powerful suite for e-books and .cbr comics, allowing you to edit the metadata of books like their descriptions and covers. You can also tag them to categorize your book library.
Koodo reader is also a library and e-reader, but offers a much simpler and minimalist interface.
Games: CD-ROM, Floppy Reader, Steam, GOG, Lutris, Pegasus, and Waydroid.
The CD-ROM and floppy drive allow access to older media formats. I know there are ways around this, but I wanted the original media experience. These can also be mounted and read by emulators like Dosbox X.
Steam offers not only being a great storefront, but also Proton which makes gaming on Linux a breeze.
GOG is a great option for DRM-free games, which respect the integrity of your machine.
Lutris can be used as a frontend, but more importantly offers easy management and installation of Windows games with Wine or Proton.
Pegasus offers the perfect customizable frontend to emulated, Steam, Lutris, and GOG games so that you can craft your library exactly how you like it.
Waydroid allows you to install and play Android games on your pc.
Music: 8Track Player, AM/FM Radio, Cassette Deck, CD-ROM, Record Player, Celluloid, Nuclear, and Shortwave.
Having an audio board connected to all of those media devices enables you to switch between any physical type of media with the push of a button.
Celluloid allows you to listen to any downloaded music you have, Nuclear allows you to discover new music, and Shortwave gives you access to internet radio stations around the globe.
Video: VCR, DVD-ROM, Freetube, Kodi, Librewolf.
The VCR and DVD-ROM allow access to physical video media.
Freetube offers privacy friendly access to YouTube content.
Kodi allows you to organize any digital video media you may have.
Librewolf gives you privacy friendly access to online streaming services like Netflix etc. Do be aware that you have to enable DRM for some streaming sites, which is a compromise to your security and privacy.
Virtualization
I will be setting up virtualization using KVM and Virt -Manager to make GUI setup easier.
First step is to enable virtualization in the BIOS. Shut down your computer and press F2 or del repeatedly until the BIOS menu appears. Navigate to Advanced>CPU Configuration>SVM Mode, and enable SVM Mode.
Boot up the computer and open a terminal. We will now be installing KVM and Virt-Manager via dnf, which will also download all the required dependencies:
sudo dnf install KVM
sudo dnf install virt-manager
Once done, run virt manager by just typing virt-manager.
Next step is to get a legal copy of Windows 10. You can buy a fresh install or if you have an existing install you can jump through some hoops to get one. This also works with any OS, so if you want to try out other Linux distros or even Android x86, you just need the .iso file.
In Virt-Manager, go to File>New Virtual machine. Here are the basic steps for setting up a new machine:
- Choose Local install (ISO)
- ISO Folder: It is good practice to make an iso folder somewhere and make a pool for your isos. Put your iso file somewhere safe and click browse in virt-manager.
- Making a pool: Click the + button in the bottom left and create a pool from the folder you placed your iso in. A new entry should appear on the left; click it, then select the iso file and then click choose volume.
- VM RAM and CPU: Next up is selecting how much RAM and how many cores you want your VM to use. If you plan on using both at the same time, delegate as needed, otherwise we can max them out for optimal computing power. Set RAM to 62,000 and CPU cores to 32.
- VM Storage: Now we will create the storage for your VM. If installing Windows, allocate at least 60GB, and adjust for whatever use you may have for the VM, e.g. if you are installing a 20GB game, allocate 100GB total. 60GB OS + 20GB game + 20GB buffer = 100GB total.
- If you want your storage to not be on your main drive, select the custom option and click manage. Make a new pool for your VM and create a new .qcow2 volume where you want your vm storage to reside.
- Next, name your VM and click install. This will bring you to the live installer where, depending on your os, you can install to the storage file we made earlier.
- Follow the install instructions and boot into your new VM.
- Congrats! You are now running multiple OSes.
I will also make a tutorial on GPU passthrough with KVM/QEMU for gaming eventually; stay tuned.